
Integration to an IDP via OIDC
AuthID Integration
Overview
Configuring authID's backend and user-preferred identity provider are the two separate locations that must be configured to establish a connection to the authID OIDC service. Along with examples of well-known identity providers users can integrate with, this page walks through creating an integration within authID.
Identity Portal
Although some users prefer to use the API endpoints to generate an OIDC integration within authID's backend system, this guide covers the integration creation via the Identity Portal.
Start login to the Identity Portal and navigate to the Cloud Connections > OpenID > New Connection blade of the menu:

New Connection
New Connection
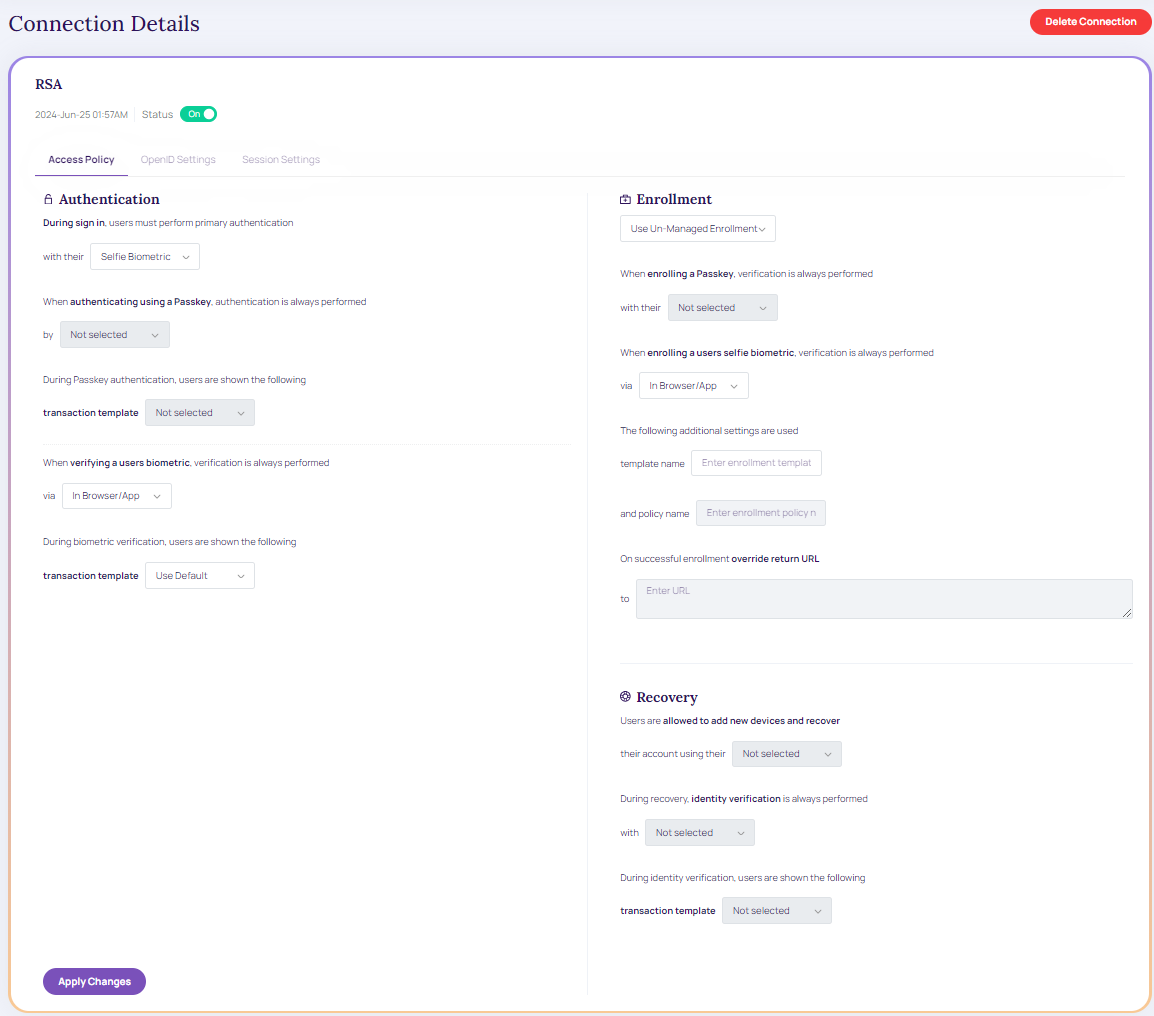
Access Policy
This page contains various scenarios where a user encounters the desired behavior of the OIDC connection.
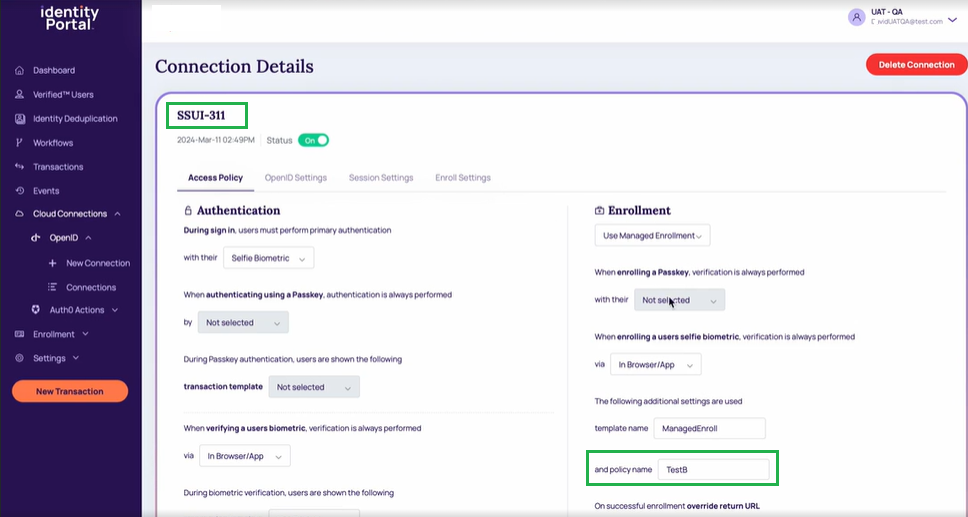
Access Policy.
Biometric or Virtual Passkey must allow the user to:
- If enrolled, authenticate using a biometric.
- If enrolled, authenticate using a virtual passkey.
- Always utilize biometric authentication if the user has enrolled both credentials.
- Invoke the configured enrollment policy if the user is unable to utilize either their biometric or virtual passkey.
- Authentication: During sign-in users must perform primary authentication. Based on the selected primary authentication type, the below authentication fields are enabled.
- During Passkey authentication, users are shown the following transaction template.
- When verifying a user biometric, verification is always performed via.
- During biometric verification, users are shown the following transaction template.
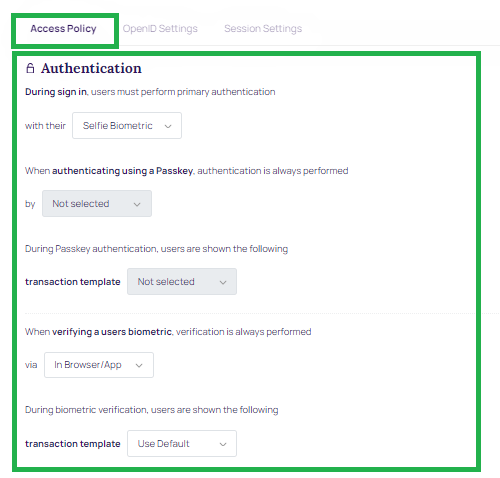
Authentication
- Enrollment: Based on the enrollment type, the below-enrolling scenarios are enabled:
- When enrolling a Passkey, verification is always performed with their.
- When enrolling a user selfie biometric, verification is always performed via
- Template name
- Policy name
Enrollment Policy ConfigurationEnrollment Policy configuration must be used if the user lacks both a biometric and a virtual passkey.
The "BioOnly" OIDC Policy for Authentication and Enrollment and the built-in Un-Managed (also known as Enabled) Enrollment Policy must only enroll biometric data. SSUI Managed Enrollment Policy is intended to be compatible with this feature.
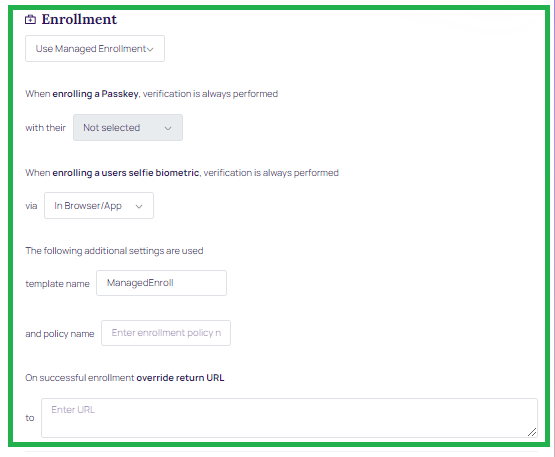
Enrollment
-
Recovery: Users are allowed to add new devices and recover.
- During recovery, identity verification is always performed.
- During identity verification, users are shown the transaction template.
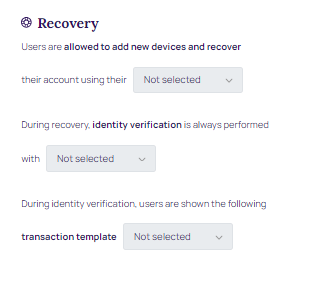
Recovery
Once the parameters are updated, click Apply Changes.
Status: ON/OFF.

Status
OpenID Settings
After creating this integration, it is presented with a Client ID and Client secret. These values will be used when configuring the identity provider connections on other platforms, and the Identity Portal does not save these values. Make sure to copy it or store it in your application if using the API endpoints.
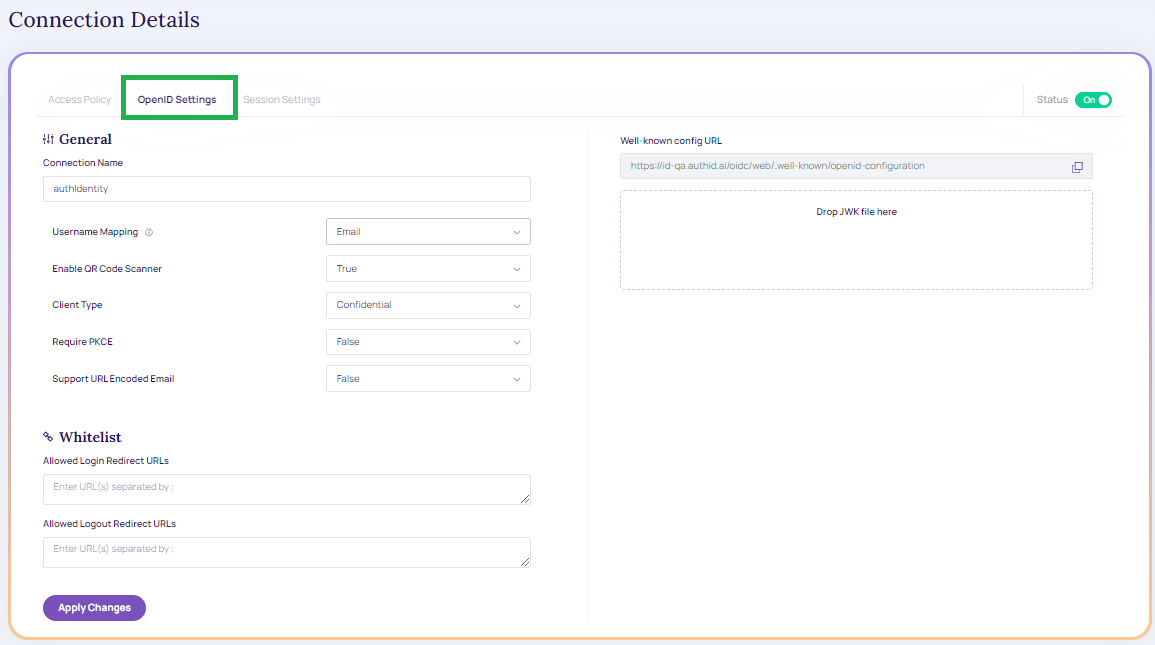
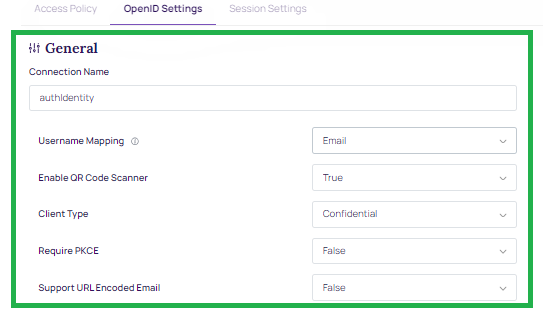
OpenID Settings
- Connection Name: Name of the integration.
- Username Mapping: OIDC user claim (attribute) mapped to Verified Account ID for the user in the authID platform. It can be email, phone number, or username. Note that the allowed characters are listed below:
- Upper and lower case letters (A-z), numbers (0-9)
- Symbols: periods (.), hyphens ( - ), underscores ( _ ), the @ sign , hash ( # ), Circumflex accent ( ^ ), exclamation ( ! ) , tilde ( ~ ), grave accent ( ' )
- See the screenshot of the experience using a phone number:

Claims behavior when “OIDC Username Mapping = Display Name”When the Username Mapping field is set to Display Name in the authID policy, the account lookup is going to be made by DisplayName attribute instead of AccountNumber. Additionally following claims in the OIDC ID Token will contain the DisplayName value instead of the AccountNumber:
subnamepreferred_usernameIn this mode, all three of those claims will map to the user's DisplayName. This enables delegated IdPs to recognize the user via the returned token using DisplayName rather than AccountNumber.
- Client Type: Public or Confidential. Public clients will not generate a client secret. Both can be used with or without PKCE.
- Require PKCE: Sets whether PCKE is mandatory to complete authentication. Public clients can be used without PKCE but this is not recommended.
- Support URL Encoded Email:
General Information
- Whitelist:
- Allowed Login Redirect URLs: URLs used by the identity provider to handle login callbacks
- Allowed Logout Redirect URLs: URLs used by the identity provider to handle logout callbacks
- Well-known config URL: URL for OIDC document discovery. Contains URL endpoints for platforms that do not support document discovery

Whitelist
Click Apply Changes.
WhitelistIf user know the domain name, user can generate redirect URLs for common scenarios for the major identity providers are discussed in this guide. If users are leveraging additional custom domains, these URLs must be separated by commas.
Session Settings
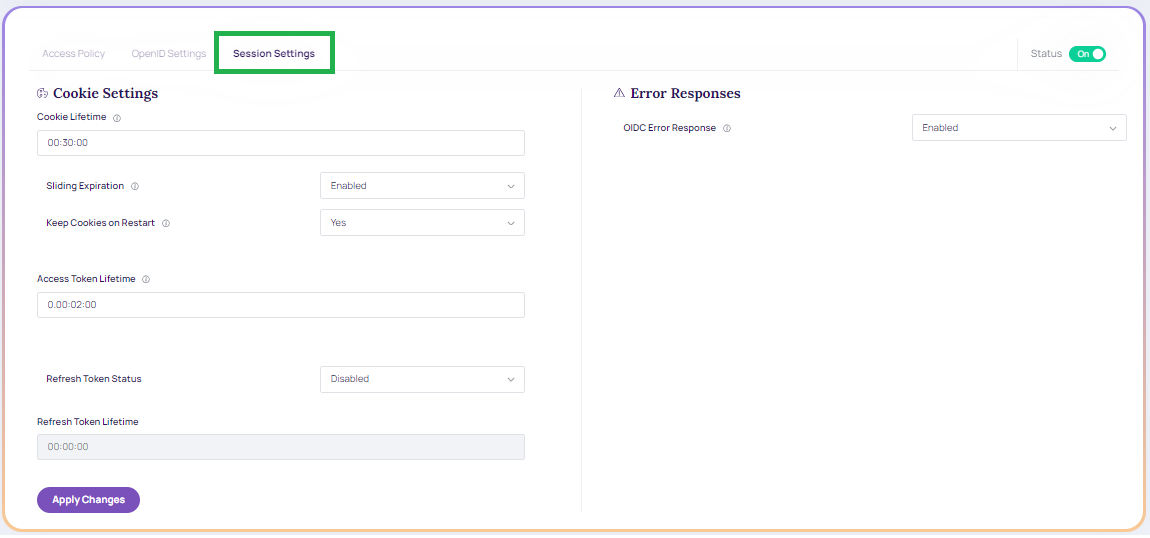
Session Settings.
-
Cookie Settings
- Cookie Lifetime: The duration of the cookies that the user's browser receives after a successful authentication from the IDComplete OIDC Service. The user remains logged in if the cookie remains valid, meaning that authentication is not carried out (in that browser).
- Sliding Expiration: The authentication cookie's validity period is reset to the expiration timeout value when Sliding Expiration is enabled. If the user continues to browse after half of the delay has passed, this occurs.
- Keep Cookie on Browser Restart: It determines if the cookie is retained after a browser restart. If the corresponding parameter in the integration is not set, this value can be utilized.
- Access Token Lifetime: Token lifetime granted by the authID OIDC server to Okta, Auth0, and so on, OR the application if our OIDC is utilized as the main identity provider.
- Refresh Token: It makes it possible for the client application to obtain fresh access tokens without requiring the user to log in once more. If users are requesting the offline_access scope, you must provide this.
- Refresh Token Lifetime: Validity of the refresh token.
-
Error Responses
- OIDC Error Response: determines whether to send detailed error messages to the end-user or client application.
AMR Values
In support of RFC-8176, authID now returns Authentication Method Reference (AMR) values as part of the OIDC response to better support customers who need to know what authentication methods were used during the authentication process.
The following values will be returned for the appropriate scenarios:
- Face: When biometric verification (not enrollment) is performed.
- User: When a liveness check is performed during biometric verification or enrollment.
- hwk: When FIDO2 verification (not enrollment) is performed.
- SMS: When the verification link is sent via SMS transport.
- Email: It is a custom value outside of the RFC spec it is returned when the verification link is sent via email transport.
Microsoft Entra MFA External Authentication Method
Overview
authID can be configured as a Microsoft Entra External Authentication Method (EAM) to provide biometric-based MFA using OIDC.
In this configuration, authID acts as an OIDC External Authentication Method Provider and is invoked by Microsoft Entra only during MFA challenges.
OIDC Flow Requirements
Microsoft Entra requires support for the Hybrid OIDC flow (response_type=code id_token).
Implicit-only or authorization-code–only flows are not supported for External Authentication Methods.
Incoming Request Handling
When invoked by Microsoft Entra, authID receives an id_token_hint parameter.
authID behavior:
- Validate the token signature
- Do not enforce token expiration
- Parse claims for user correlation and MFA response
The client-request-id provided by Microsoft is captured and written into authID logs for traceability.
Required Claims
authID parses the following claims from the Microsoft Entra request:
oid– Microsoft Entra unique user identifier (must be stored as an account attribute)tid– Tenant identifiersub– Subject identifierpreferred_username– Username hint
The oid claim must be retained to uniquely associate Entra users with authID accounts.
ACR and AMR Requirements
- The acr value received from Microsoft must be echoed unchanged in the response.
- Returned amr values must conform to Microsoft-supported AMR claims.
Invalid or missing acr / amr values will cause Microsoft Entra to reject the MFA response.
Optional User Enrichment
Optionally, authID can retrieve additional user attributes via Microsoft Graph API when explicitly configured and authorized.
Note:
To configure this service, you must select
client type=Public. That way, it only generates theClientIDwhich can be configured in MS.
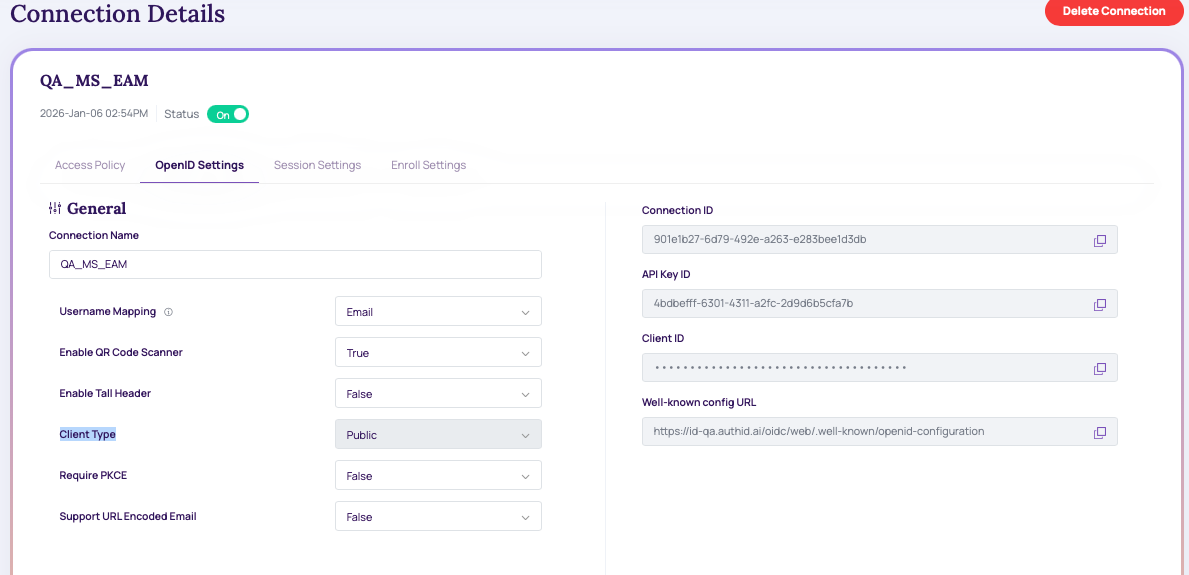
Connections
The created connections details are displayed under the Connections section.
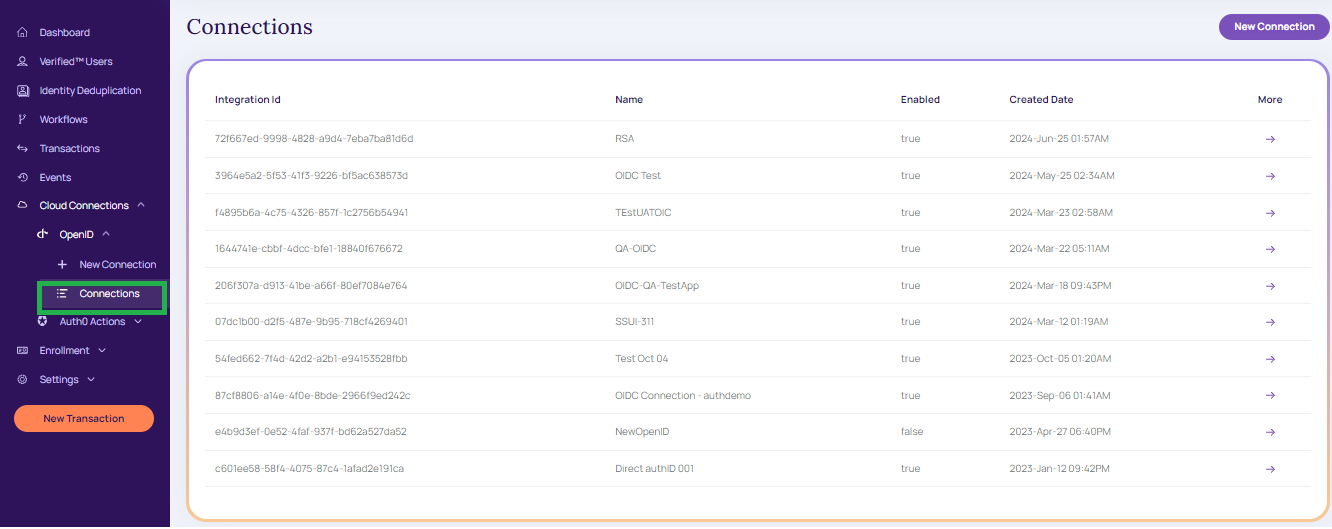
Connections
Modify Connections
To modify the connection, follow the below procedure:
- From the create connection grid table, click on the appropriate integration ID the Connection details screen displays,
Modify Connection.
- Once the appropriate modification is updated click Apply Changes. A message displays as in the below screen
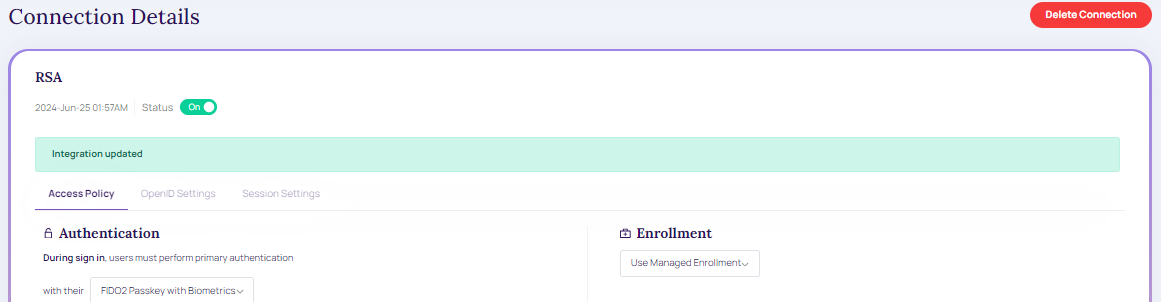
Modified Connection.
Delete Connection
To delete the connection,
- From the existing connection grid table, click on the appropriate integration ID the Connection Details screen displays,
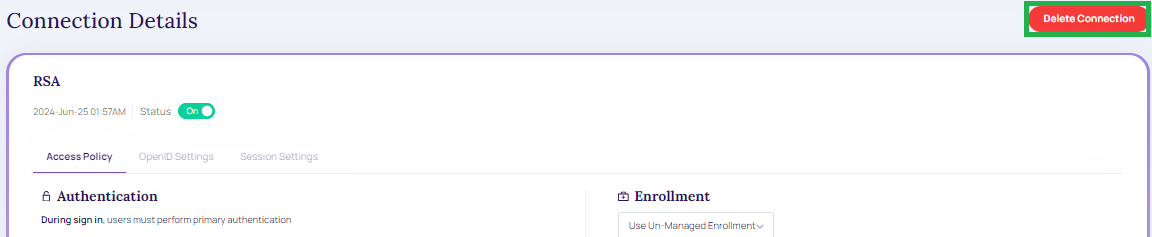
Existing Connection.
- Click Delete Connection. The below message window displays.
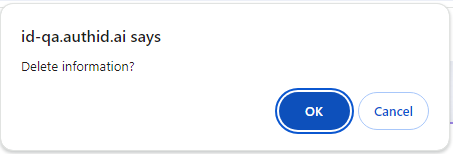
Delete Information.
- Click OK to continue to delete the created or existing connections.
- Click "Cancel" to cancel the "connections details" screen.
Video Walkthrough
The following video displays how to set up an OIDC connection in the Identity Portal.
 ](https://player.vimeo.com/video/790223856?h=4b134ba582)
AuthID Integration
Overview
Configuring authID's backend and user-preferred identity provider are the two separate locations that must be configured to establish a connection to the authID OIDC service. Along with examples of well-known identity providers users can integrate with, this page walks through creating an integration within authID.
Identity Portal
Although some users prefer to use the API endpoints to generate an OIDC integration within authID's backend system, this guide covers the integration creation via the Identity Portal.
Start login to the Identity Portal and navigate to the Cloud Connections > OpenID > New Connection blade of the menu:
New Connection
New Connection
Access Policy
This page contains various scenarios where a user encounters the desired behavior of the OIDC connection.
Access Policy.
Biometric or Virtual Passkey must allow the user to:
- If enrolled, authenticate using a biometric.
- If enrolled, authenticate using a virtual passkey.
- Always utilize biometric authentication if the user has enrolled both credentials.
- Invoke the configured enrollment policy if the user is unable to utilize either their biometric or virtual passkey.
- Authentication: During sign-in users must perform primary authentication. Based on the selected primary authentication type, the below authentication fields are enabled.
- During Passkey authentication, users are shown the following transaction template.
- When verifying a user biometric, verification is always performed via.
- During biometric verification, users are shown the following transaction template.
Authentication
- Enrollment: Based on the enrollment type, the below-enrolling scenarios are enabled:
- When enrolling a Passkey, verification is always performed with their.
- When enrolling a user selfie biometric, verification is always performed via
- Template name
- Policy name
Enrollment Policy ConfigurationEnrollment Policy configuration must be used if the user lacks both a biometric and a virtual passkey.
The "BioOnly" OIDC Policy for Authentication and Enrollment and the built-in Un-Managed (also known as Enabled) Enrollment Policy must only enroll biometric data. SSUI Managed Enrollment Policy is intended to be compatible with this feature.
Enrollment
-
Recovery: Users are allowed to add new devices and recover.
- During recovery, identity verification is always performed.
- During identity verification, users are shown the transaction template.
Recovery
Once the parameters are updated, click Apply Changes.
Status: ON/OFF.
Status
OpenID Settings
After creating this integration, it is presented with a Client ID and Client secret. These values will be used when configuring the identity provider connections on other platforms, and the Identity Portal does not save these values. Make sure to copy it or store it in your application if using the API endpoints.
OpenID Settings
- Connection Name: Name of the integration.
- Username Mapping: OIDC user claim (attribute) mapped to Verified Account ID for the user in the authID platform. It can be email, phone number, or username. Note that the allowed characters are listed below:
- Upper and lower case letters (A-z), numbers (0-9)
- Symbols: periods (.), hyphens ( - ), underscores ( _ ), the @ sign , hash ( # ), Circumflex accent ( ^ ), exclamation ( ! ) , tilde ( ~ ), grave accent ( ' )
- See the screenshot of the experience using a phone number:
Claims behavior when “OIDC Username Mapping = Display Name”When the Username Mapping field is set to Display Name in the authID policy, the account lookup is going to be made by DisplayName attribute instead of AccountNumber. Additionally following claims in the OIDC ID Token will contain the DisplayName value instead of the AccountNumber:
subnamepreferred_usernameIn this mode, all three of those claims will map to the user's DisplayName. This enables delegated IdPs to recognize the user via the returned token using DisplayName rather than AccountNumber.
- Client Type: Public or Confidential. Public clients will not generate a client secret. Both can be used with or without PKCE.
- Require PKCE: Sets whether PCKE is mandatory to complete authentication. Public clients can be used without PKCE but this is not recommended.
- Support URL Encoded Email:
General Information
- Whitelist:
- Allowed Login Redirect URLs: URLs used by the identity provider to handle login callbacks
- Allowed Logout Redirect URLs: URLs used by the identity provider to handle logout callbacks
- Well-known config URL: URL for OIDC document discovery. Contains URL endpoints for platforms that do not support document discovery
Whitelist
Click Apply Changes.
WhitelistIf user know the domain name, user can generate redirect URLs for common scenarios for the major identity providers are discussed in this guide. If users are leveraging additional custom domains, these URLs must be separated by commas.
Session Settings
Session Settings.
-
Cookie Settings
- Cookie Lifetime: The duration of the cookies that the user's browser receives after a successful authentication from the IDComplete OIDC Service. The user remains logged in if the cookie remains valid, meaning that authentication is not carried out (in that browser).
- Sliding Expiration: The authentication cookie's validity period is reset to the expiration timeout value when Sliding Expiration is enabled. If the user continues to browse after half of the delay has passed, this occurs.
- Keep Cookie on Browser Restart: It determines if the cookie is retained after a browser restart. If the corresponding parameter in the integration is not set, this value can be utilized.
- Access Token Lifetime: Token lifetime granted by the authID OIDC server to Okta, Auth0, and so on, OR the application if our OIDC is utilized as the main identity provider.
- Refresh Token: It makes it possible for the client application to obtain fresh access tokens without requiring the user to log in once more. If users are requesting the offline_access scope, you must provide this.
- Refresh Token Lifetime: Validity of the refresh token.
-
Error Responses
- OIDC Error Response: determines whether to send detailed error messages to the end-user or client application.
AMR Values
In support of RFC-8176, authID now returns Authentication Method Reference (AMR) values as part of the OIDC response to better support customers who need to know what authentication methods were used during the authentication process.
The following values will be returned for the appropriate scenarios:
- Face: When biometric verification (not enrollment) is performed.
- User: When a liveness check is performed during biometric verification or enrollment.
- hwk: When FIDO2 verification (not enrollment) is performed.
- SMS: When the verification link is sent via SMS transport.
- Email: It is a custom value outside of the RFC spec it is returned when the verification link is sent via email transport.
Microsoft Entra MFA External Authentication Method
Overview
authID can be configured as a Microsoft Entra External Authentication Method (EAM) to provide biometric-based MFA using OIDC.
In this configuration, authID acts as an OIDC External Authentication Method Provider and is invoked by Microsoft Entra only during MFA challenges.
OIDC Flow Requirements
Microsoft Entra requires support for the Hybrid OIDC flow (response_type=code id_token).
Implicit-only or authorization-code–only flows are not supported for External Authentication Methods.
Incoming Request Handling
When invoked by Microsoft Entra, authID receives an id_token_hint parameter.
authID behavior:
- Validate the token signature
- Do not enforce token expiration
- Parse claims for user correlation and MFA response
The client-request-id provided by Microsoft is captured and written into authID logs for traceability.
Required Claims
authID parses the following claims from the Microsoft Entra request:
oid– Microsoft Entra unique user identifier (must be stored as an account attribute)tid– Tenant identifiersub– Subject identifierpreferred_username– Username hint
The oid claim must be retained to uniquely associate Entra users with authID accounts.
ACR and AMR Requirements
- The acr value received from Microsoft must be echoed unchanged in the response.
- Returned amr values must conform to Microsoft-supported AMR claims.
Invalid or missing acr / amr values will cause Microsoft Entra to reject the MFA response.
Optional User Enrichment
Optionally, authID can retrieve additional user attributes via Microsoft Graph API when explicitly configured and authorized.
Note:
To configure this service, you must select
client type=Public. That way, it only generates theClientIDwhich can be configured in MS.
Connections
The created connections details are displayed under the Connections section.
Connections
Modify Connections
To modify the connection, follow the below procedure:
- From the create connection grid table, click on the appropriate integration ID the Connection details screen displays,
Modify Connection.
- Once the appropriate modification is updated click Apply Changes. A message displays as in the below screen
Modified Connection.
Delete Connection
To delete the connection,
- From the existing connection grid table, click on the appropriate integration ID the Connection Details screen displays,
Existing Connection.
- Click Delete Connection. The below message window displays.
Delete Information.
- Click OK to continue to delete the created or existing connections.
- Click "Cancel" to cancel the "connections details" screen.
Video Walkthrough
The following video displays how to set up an OIDC connection in the Identity Portal.
](https://player.vimeo.com/video/790223856?h=4b134ba582)
Recovery Password During Enrollment
Recovery Password can be used as a second authentication factor during user enrollment when automatic credential enrollment is enabled through an OIDC policy or when users are enrolled via API.
OIDC Enrollment
When automatic enrollment is configured in an OIDC policy, Recovery Password validation can be required before credential enrollment begins.
Validation can be handled in one of the following ways:
- Directly by the OIDC Service
- By forwarding the enrollment flow to the Signup Service, where Recovery Password validation is performed before continuing enrollment
API-Driven Enrollment
Users can be enrolled via API without using the interactive Signup Service flow. In this model, a temporary Recovery Password is issued and must be validated as a second factor before enrollment is completed.
Recovery Password Constraints
- A Recovery Password can be used a limited number of times
- Initial implementation supports a single successful OIDC workflow
- An expiration time may be configured (optional for initial implementation)
Once the usage limit is reached or the password expires, the Recovery Password becomes invalid.
Updated 6 months ago